All posts by admin

Resolving Sitecore SXA 9.3 Core Library JavaScript Security Vulnerabilities

Resolving Sitecore SXA 9.3 Lodash Security Vulnerabilities

SXA themes: Themes define the look and feel of a site and can be created separately from the site functionality and content. There are two types of themes: base themes and site themes.
Base Themes are built on top of a set of core, third-party CSS and JavaScript libraries such as jQuery, jQuery UI, Lodash, etc.
Lodash is included as a part of Sitecore Experience Accelerator.

The problem


Lodash versions prior to 4.17.21 are vulnerable to Command Injection via the template function.

The vulnerability in lodash versions prior to 4.17.21 is described herehttps://nvd.nist.gov/vuln/detail/CVE-2021-23337

These security vulnerabilities were discovered when auditing best practices with Google Lighthouse.  Here is an example of Lo-dash vulnerability using Chrome DevTools.

The solution

The official recommended approach would be to upgrade Sitecore to ensure this utilizes the updated library which was tested in 10.2. However the alternative approach is to update lo-dash version in the current Sitecore version.
Fortunately, resolving this issue is fairly simple and straightforward.

  • Download the latest lodash (lodash.min.js – as an example can be downloaded from https://github.com/lodash/lodash/releases/tag/4.17.21 or consider downloading it from SXA 10.2)
  • Ensure to add the customization at the bottom of the file which SXA performs if this is downloaded from npm/github :
  • Upload lodash.min.js to lo-dash item in Sitecore ( /sitecore/media library/Base Themes/Core Libraries/scripts/lo-dash )
  • Publish the changes and you are done.
Trim old versions of Sitecore items

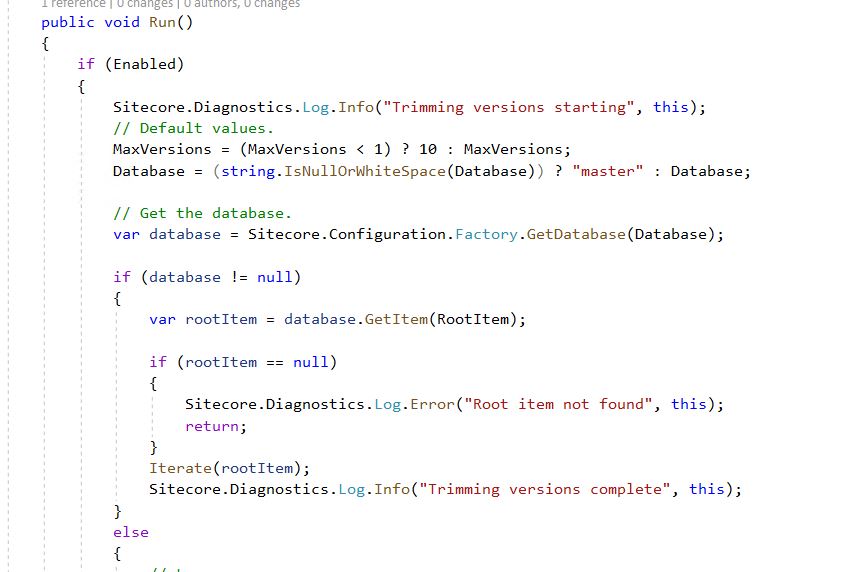
Sitecore Scheduled task to trim old versions of items

From our client, we got a requirement to clean up the database, and to keep only 10 versions of each item, first one, and last 9. It happens that they had 300+ versions for most edited items.

The code for the class:

public class TrimOlderVersions
    {
        public bool Enabled { get; set; }
        public int MaxVersions { get; set; }
        public string Database { get; set; }
        public string RootItem { get; set; }

        public void Run()
        {
            if (Enabled)
            {
                Sitecore.Diagnostics.Log.Info("Trimming older versions of items starting", this);
                // Default values.
                MaxVersions = (MaxVersions < 1) ? 10 : MaxVersions;
                Database = (string.IsNullOrWhiteSpace(Database)) ? "master" : Database;

                // Get the database.
                var database = Sitecore.Configuration.Factory.GetDatabase(Database);

                if (database != null)
                {
                    var rootItem = database.GetItem(RootItem);

                    if (rootItem == null)
                    {
                        Sitecore.Diagnostics.Log.Error("Root item not found", this);
                        return;
                    }
                    Iterate(rootItem);
                    Sitecore.Diagnostics.Log.Info("Trimming versions complete", this);
                }
                else
                {
                    // Log.
                    Sitecore.Diagnostics.Log.Warn(string.Format("{0}: Failed to run. Database \"{1}\" is null.", this, Database), this);
                }
            }
            else
            {
                // Log.
                Sitecore.Diagnostics.Log.Info(string.Format("{0}: Task disabled.", this), this);
            }
        }

        protected void Iterate(Item item)
        {
            if (item != null)
            {
                // Get the version count of the item.
                var versionCount = item.Versions.GetVersionNumbers().Length;
                var latestVersion = item.Versions.GetLatestVersion(item.Language).Version.Number;

                // Don't bother looping if they're aren't enough versions.
                if (versionCount > MaxVersions)
                {
                    // Get all the versions we can archive.
                    var versions = item.Versions.GetVersions().Where(i => i.Version.Number <= (latestVersion - MaxVersions + 1) && i.Version.Number!=1);

                    foreach (var version in versions)
                    {
                        var archive = Sitecore.Data.Archiving.ArchiveManager.GetArchive("archive", Sitecore.Configuration.Factory.GetDatabase(Database));
                        if (archive != null)
                            archive.ArchiveVersion(version);
                    }
                }

                // recursive call for children
                foreach (Item child in item.Children)
                {
                    Iterate(child);
                }
            }
        }
    }

and sample config file

<configuration xmlns:patch="http://www.sitecore.net/xmlconfig/">
  <sitecore>
    <settings>
      <setting name="TrimVersions.MaxVersions" value="9"/>
      <setting name="TrimVersions.TimeOfDayToRun" value="2:00"/>
    </settings>
  </sitecore>
</configuration>

Dont forget to register the command under Sitecore Tasks – Commands, and create corresponding Scheduler.

Automating Workflow State Changes in Sitecore Using PowerShell

While working on a Sitecore SXA project, I needed to create a new site by cloning an existing one and performing various updates. As part of this process, I ended up with a large number of items in a draft state, which needed to be transitioned to the final workflow state. Manually publishing each item was not feasible due to the sheer volume, so I created a PowerShell script to automate this task by updating the workflow state of all items to the final state.

In this post, I’ll walk you through the problem, the solution, and provide a cleaned-up version of the PowerShell script I used to accomplish this.

The Problem

In Sitecore, when creating or cloning a site, content items often remain in the draft state or some intermediate workflow state. If you have a lot of items, moving them to the final state manually via the Sitecore interface is tedious and time-consuming.

The solution? Use Sitecore PowerShell Extensions (SPE) to script the process, which allows you to:

  • Automate the transition of items to the final workflow state.
  • Handle multiple languages and content tree hierarchies.
  • Output a summary of the total items checked and updated.

The Solution: PowerShell Script to Update Workflow States

Here’s the cleaned-up version of the PowerShell script I used to change the workflow state for all items under a specific site path to the final state. This script runs in the context of Sitecore’s SPE module.

PowerShell Script for Updating Items to Final Workflow State

# Begin a bulk update context to optimize the process
New-UsingBlock (New-Object Sitecore.Data.BulkUpdateContext) {

    # Define the root path of the site you want to update
    $rootItemPath = "master:/sitecore/content/YourSite/YourSiteName"
    
    # Define the languages you want to support
    $languages = @("en")  # Add more languages as needed

    # The final workflow state GUID (replace with your own)
    $workflowFinalState = "{Your-Final-Workfow-State-ID}"

    $updatedItemsCount = 0
    $checkedItemsCount = 0

    # Hashtable to track updated items by language
    $updatedItemsPerLanguage = @{}

    # Loop through each language
    foreach ($language in $languages) {

        # Initialize count for this language
        $updatedItemsPerLanguage[$language] = 0

        # Get the root item in the current language
        $rootItem = Get-Item -Path $rootItemPath -Language $language

        # Retrieve the root item and its children
        $items = @($rootItem) + (Get-ChildItem -Item $rootItem -Recurse -Language $language)

        foreach ($item in $items) {
            if ($item -ne $null) {
                $checkedItemsCount++
                
                # Get the current workflow state
                $currentWorkflowState = $item["__Workflow state"]

                # If the item's workflow state is not already in the final state, update it
                if ($currentWorkflowState -ne $workflowFinalState) {
                    $item.Editing.BeginEdit()
                    $item.Fields["__Workflow state"].Value = $workflowFinalState
                    $item.Editing.EndEdit() > $null
                    Write-Host "$($item.Paths.FullPath) in $language --> Updated"
                    $updatedItemsCount++
                    $updatedItemsPerLanguage[$language]++
                } else {
                    Write-Host "$($item.Paths.FullPath) in $language --> Already in the desired state"
                }
            }
        }
    }

    # Output summary of the process
    Write-Host "Total items checked: $checkedItemsCount"
    Write-Host "Total items updated: $updatedItemsCount"

    # Display the number of updated items per language
    foreach ($lang in $languages) {
        Write-Host "Items updated in $lang: $($updatedItemsPerLanguage[$lang])"
    }
}

How the Script Works:

  1. Bulk Update Context: The script begins with New-UsingBlock (New-Object Sitecore.Data.BulkUpdateContext) to ensure the updates are processed efficiently and without performance bottlenecks. This is crucial when updating many items.
  2. Language Support: The $languages array allows you to define the languages in which the items exist. In this example, it’s set to "en" for English, but you can add other language codes like "fr", "de", etc.
  3. Final Workflow State: The $workflowFinalState variable holds the GUID of the final workflow state. You’ll need to replace this with the correct GUID for the final state in your workflow.
  4. Recursive Item Fetching: The script retrieves the root item and its children using Get-ChildItem with the -Recurse flag. This ensures all items under the root path are included.
  5. Workflow State Check: For each item, the script checks if it’s already in the final workflow state. If not, it updates the __Workflow state field and commits the change.
  6. Summary: After processing, the script outputs a summary showing how many items were checked and updated, broken down by language.

How to Run the Script

  1. Install Sitecore PowerShell Extensions (SPE): If you don’t already have SPE installed on your Sitecore instance, you’ll need to install it. This module allows you to execute PowerShell scripts inside Sitecore.
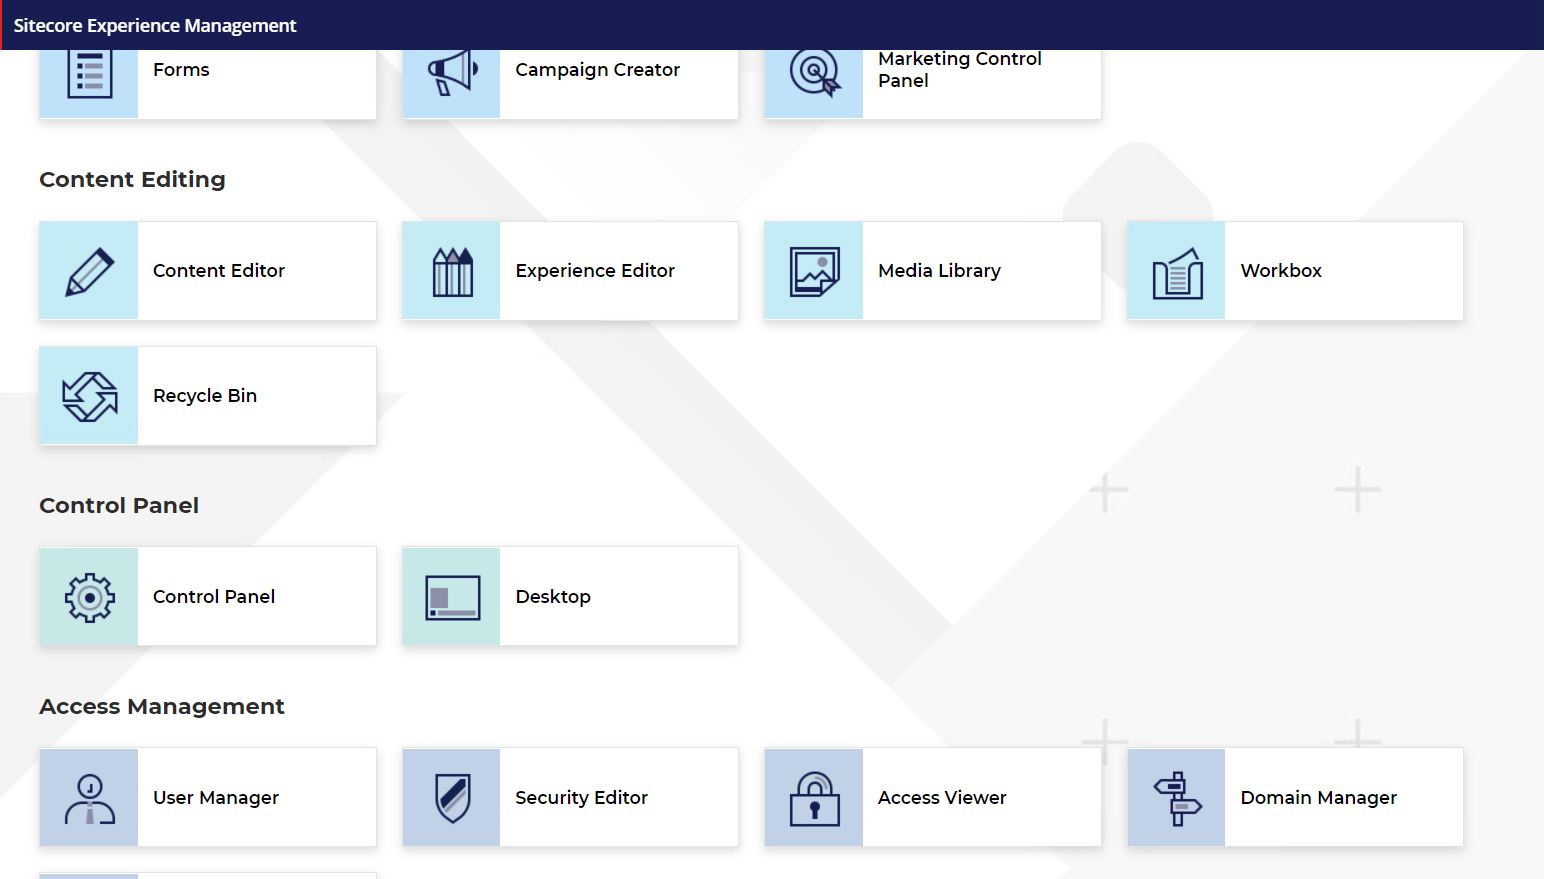
  2. Run the Script: Open the PowerShell ISE or PowerShell Console in Sitecore under the Control Panel and paste the script. Adjust the $rootItemPath, $languages, and $workflowFinalState as necessary for your environment.
  3. Execute: Run the script. The output will show the paths of the items being updated and provide a summary at the end.

When Should You Use This?

This script is handy when:

  • You’ve cloned a site and need to batch update all items to their final workflow state.
  • Items remain stuck in draft or intermediate workflow states after deployment.
  • You’re working with multilingual sites and need to ensure content across different languages is published.
  • You want to automate workflow transitions for large sets of content.

Conclusion

Automating workflow state transitions in Sitecore using PowerShell not only saves time but also ensures consistency across large batches of content items. By using this script, you can efficiently update thousands of items, taking care of language-specific versions and ensuring everything is in the correct final workflow state.

Fixing Kudu Console Item Limit in Azure: A Simple Solution

While working with Sitecore Managed Cloud, I needed to check if all Unicorn items were deployed correctly. However, I ran into an issue where Kudu displayed an error:

“The number of items is too large to be displayed.”

This occurred because the number of items in the directory was too large for Kudu’s default view limit. If you’ve encountered a similar issue when trying to verify large numbers of items, such as Unicorn serialized items or large content folders, there’s a quick fix to increase the item limit in Kudu.

Here’s how you can resolve it and view all the items in your directories.

The Issue: Kudu’s Display Limit

By default, the Kudu console is configured to limit the number of items it displays in the browser. When you try to view directories with many files (more than a few hundred, for example), it hits this display limit and stops rendering additional items.

The default setting often caps the view at around 300-500 items. If you’re working with directories containing many more files (e.g., Unicorn items, logs, or large media directories), this limit can block your ability to fully inspect the contents.

The Solution: Increase the Max Viewable Items

Thankfully, there’s a simple fix for this issue: increase the number of items Kudu can display in the browser. We can do this using the browser’s developer tools by adjusting a setting in the local storage for Kudu.

Here’s how you can do it:

Step-by-Step Guide to Fixing the Kudu Item Limit

  1. Open Kudu for Your App Service
    • Navigate to your Azure portal and go to your App Service.
    • Under the “Development Tools” section in the left-hand menu, click on Advanced Tools and then select Go. This will open the Kudu interface.
  2. Access the Kudu Console
    • In the Kudu interface, click on the Debug Console tab.
    • From here, you can access either the CMD or PowerShell debug console to browse files and execute commands.
  3. Open the Browser Developer Tools
    • Once in the Kudu console, press F12 (or Ctrl + Shift + I on Windows, or Cmd + Option + I on Mac) to open your browser’s developer tools.
    • Navigate to the Console tab within the developer tools.
  4. Increase the Maximum Viewable Items
    • In the console, run the following command to increase the number of items Kudu can display:
window.localStorage['maxViewItems'] = 1000;
  • This command sets the maximum number of items that Kudu can display to 1000. If you have more than 1000 items in a directory, you can increase this number even further by adjusting the value.
  • Refresh the Kudu Console
    • After running the command, refresh the Kudu page or the directory listing to apply the new setting.
    • You should now be able to view up to 1000 items (or more if you set a higher value) in the directory.

Why Does This Work?

Kudu’s item display limit is stored in the browser’s local storage, which is why we can manipulate it using JavaScript via the developer tools. By manually increasing the maxViewItems property, we override the default display limit and allow the Kudu interface to render more items at once.

When to Use This Fix

This fix is helpful in the following scenarios:

  • Unicorn deployments: When verifying the deployment of serialized items in Sitecore (via Unicorn), you may need to inspect hundreds or thousands of items to ensure they were correctly synced.
  • Log directories: If your app generates many log files, you might need to browse through hundreds or thousands of them.
  • Media directories: Large numbers of uploaded files, images, or assets can easily exceed Kudu’s default limit.
  • Temp directories: Temporary files and caches can quickly accumulate, especially after numerous deployments or builds.

Important Notes

  • Performance: Increasing the item limit can impact performance when browsing large directories. If you increase the limit too high (e.g., 10,000 items), the Kudu interface may slow down or become unresponsive.
  • Persistence: The change to maxViewItems is stored in your browser’s local storage, so it will persist across sessions as long as you use the same browser. However, if you clear your browser’s cache or use a different machine, you will need to reapply this fix.

Conclusion

Kudu is an essential tool for Azure App Service management, but its default file display limit can be restrictive when working with large directories. By simply adjusting the maxViewItems setting in the browser’s local storage, you can bypass this limitation and view up to 1000 or more items.

This quick and easy fix will save you time and effort when managing your app’s file system in Kudu, especially when working with large Sitecore Unicorn deployments. Keep this tip handy for future debugging sessions!

Sitecore upgrade from 8.2 to 10.2

Sitecore Upgrade from 8.2 to 10.2

I’ve worked on a project Upgrade where the first task was to upgrade the existing databases. Here is a list with steps need to be performed

    • Script A – CMS_core_master_web8x.sql   – run on Core, Master and Web
    • Script C – CMS_core.sql – Run on Core
    • Script D – CMS_master.sql  – run on Master
    • Script E – CMS_web.sql  – run on Web
    • Script H – CMS_security.sql  – run on Core
  • Attach the upgraded DBs to SC 10.2 instance with updating the  ConnectionStrings.config (“C:\inetpub\wwwroot\sc10sc.dev.local\App_Config\ConnectionStrings.config” ) with the new values . For Security connection string point to Core Db.
  • Update connection string for Identity Server to match the Core db (“C:\inetpub\wwwroot\sc10identityserver.dev.local\Config\production\Sitecore.IdentityServer.Host.xml”)

Clean up the content databases

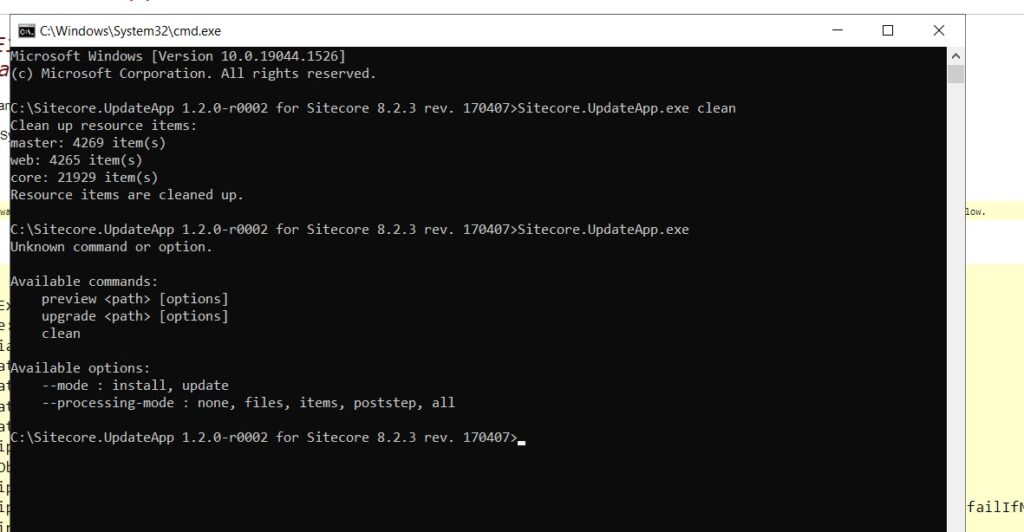
Sitecore introduces Items as resources. Before , the initial set of OOB items are in the databases. That includes default templates, layouts, workflows etc. Now with 10.1 and after all these are supplied as the resources files outside of database, as files in the file system. They are installed in website\Data folder. With that in mind, the upgraded databases need to be cleaned up. Sitecore creates a tool , called Sitecore.UpdateApp, which is a console app.

In our case, we upgrading from 8.2 Update 3 to 10.2. If you upgrading from different 8.2 version, use the corresponding Package.

  • On the Sitecore Launchpad, open the Control Panel, in the Database section, click Clean up databases, select all the databases, and then click Clean.
  • Locate the Sitecore.UpdateApp 1.2.0-r0002 for Sitecore 8.2.3 rev. 170407.zip file and  extract its contents to a folder, for example, C:\Sitecore.UpdateApp.
  • Copy the license file to the Data folder of the tool, for example, C:\Sitecore.UpdateApp\Data\license.xml.
  • In the C:\Sitecore.UpdateApp\App_Config\ConnectionStrings.config file, update the connections to your databases.
  • If you do not have a security database, use the connection to the core database.
  • Open a Command Prompt in the tool folder and run:

Sitecore.UpdateApp.exe clean

  • Clear cache (<instance_url>\sitecore\admin\cache.aspx)
Sitecore.UpdateApp result clean up database and other options

Sitecore Headless Workshop: Exploring JSS, React, and Best Practices

Recently, December 12, 2023, I organized a Sitecore Headless workshop for our team, focusing on JavaScript Services (JSS) and React. My colleague led the session, presenting key concepts and practical insights into Sitecore’s headless architecture. It was an excellent opportunity for anyone looking to learn more about the flexibility and power of a headless CMS, and how JSS can transform Sitecore development.

  1. JSS and React
  2. Benefits of Using JSS React with Sitecore
  3. Headless CMS Concept
  4. Scalability and Flexibility
  5. Real-world Examples Q&A Session

You can see some photos here.

How to create Solr custom core index and configure it for Sitecore

For one of our clients, we had a request to create custom index for searching the news. We also need to configure SwitchOnRebuild.

New Solr Core

The first step is to create new Solr core, using Solr UI , or just copy existing core.

Navigate to <folder-where-solr-is-installed>\server\solr. You will see all the cores currently created.

solr folder structure where cores are available.

I would suggest to copy scclean_web_index folder and name it sitecore_news_index. Use lower letters.

Open the folder and edit in Notepad core.properties file. Update the name to match the index folder.

name=sitecore_news_index

If you want to use SwitchOnRebuild, repeat the procedure for the secondary core – create new core and name it sitecore_news_index_sec. Change core.properties to match the core name.

name=sitecore_news_index_sec

Restart Solr, and verify that both cores are available in the Solr Admin – Core Admin.

Config file

Now is the time for the config patch. Create new file in the solution, and name it Sitecore.ContentSearch.Solr.Index.News.config. In the AddIncludedTemplate the News Template is added. You can add Events Template or any other template which you want to be stored in the index. In the crawler section the database and root folder are specified, usually root attribute contains the GUID of the News section, so everything under it will be added to the index.

After config file is deployed, rebuild the sitecore_news_index.

Here you can find example of this file.

<configuration xmlns:patch="http://www.sitecore.net/xmlconfig/">
  <sitecore>
    <contentSearch>
      <configuration type="Sitecore.ContentSearch.ContentSearchConfiguration, Sitecore.ContentSearch">
        <indexes hint="list:AddIndex">
          <index id="sitecore_news_index" type="Sitecore.ContentSearch.SolrProvider.SwitchOnRebuildSolrSearchIndex,Sitecore.ContentSearch.SolrProvider ">
            <param desc="name">$(id)</param>
            <param desc="folder">$(id)</param>
			<param desc="rebuildcore">$(id)_sec</param>
            <param desc="propertyStore" ref="contentSearch/indexConfigurations/databasePropertyStore" param1="$(id)" />
            <configuration ref="contentSearch/indexConfigurations/defaultSolrIndexConfiguration">
			<documentOptions type="Sitecore.ContentSearch.SolrProvider.SolrDocumentBuilderOptions, Sitecore.ContentSearch.SolrProvider">
              <include hint="list:AddIncludedTemplate">
                  <NewsItemTemplateId>{32C9CC0E-2FBF-4109-90C4-8849AADA1BFA}</NewsItemTemplateId>
              </include>
			  </documentOptions>
            </configuration>
            <strategies hint="list:AddStrategy">
              <strategy ref="contentSearch/indexConfigurations/indexUpdateStrategies/intervalAsyncMaster" />
              <strategy ref="contentSearch/indexConfigurations/indexUpdateStrategies/remoteRebuild" />
            </strategies>
            <commitPolicyExecutor type="Sitecore.ContentSearch.CommitPolicyExecutor, Sitecore.ContentSearch">
              <policies hint="list:AddCommitPolicy">
                <policy type="Sitecore.ContentSearch.TimeIntervalCommitPolicy, Sitecore.ContentSearch" />
              </policies>
            </commitPolicyExecutor>
            <locations hint="list:AddCrawler">
              <crawler type="Sitecore.ContentSearch.SitecoreItemCrawler, Sitecore.ContentSearch">
                <Database>master</Database>
                <Root>{F72A5801-1B41-4F51-BDB6-17BB472D18B9}</Root>
              </crawler>
            </locations>
          </index>
        </indexes>
      </configuration>
    </contentSearch>
  </sitecore>
</configuration>
Sitecore task to publish media items

Sitecore – automatically publish uploaded files/images in Media Library

Our client requested to implement a handler, which will automatically publish the media library, when content editor upload it. It happens that often Content Editors just forgot to publish the item.

Once the content editor upload the image, the OnItemSaved handler will fire, and will call the code below, which will publish to web immediately.

Note: If Content Editor decides to change the order, do sorting or so for Media Library, it will trigger huge publishing job.

The code bellow:

public class MediaItemEventHandlers
    {
        public void OnMediaItemSaved(object sender, EventArgs args)
        {
            if (args != null)
            {
                // Get the item being saved.
                var item = Event.ExtractParameter(args, 0) as Item;

                if (item != null)
                {
                    using (new SecurityDisabler())
                    {
                        if (item.Paths.IsMediaItem)
                        {
                            // Automatically publish the media item.
                            this.PublishItem(item, "web");
                            
                        }
                    }
                }
            }
        }

        private void PublishItem(Item item, string targetDbName)
        {
            if (item != null)
            {
                try
                {
                    var sourceDb = Factory.GetDatabase("master");
                    var targetDb = Factory.GetDatabase(targetDbName);

                    if (sourceDb != null && targetDb != null)
                    {
                        var options = new PublishOptions(sourceDb, targetDb, PublishMode.SingleItem, item.Language, DateTime.Now)
                        {
                            RootItem = item,
                            Deep = true
                        };

                        var publisher = new Publisher(options);
                        publisher.PublishAsync();
                    }
                }
                catch (Exception e)
                {
                    Sitecore.Diagnostics.Log.Info("Database not present " + targetDbName, this);
                }
            }
        }
    }

And the config file

<configuration xmlns:patch="http://www.sitecore.net/xmlconfig/">
  <sitecore>
    <events timingLevel="custom">
      <event name="item:saved">
        <handler type="MyNamespace.Utility.MediaItemEventHandlers, MyNamespace" method="OnMediaItemSaved" />
      </event>
    </events>
  </sitecore>
</configuration>

Sitecore Training – Part 1, or Sitecore Foundation Training Agenda

In my previous company, I was requested to help new team members getting knowing Sitecore. Most of the newcomers are never worked with CMS before, specially Front-End developers and QA team, and the training need to cover basics, so they can become more familiar with Sitecore.

So I created agenda what topics need to be covered for someone, who never work with Sitecore before. You can use this list to have structured plan how to start study.

  • Installing Sitecore
  • Three Databases (core, master, web) 
  • Basic Installation Scenarios
  • Development environment
     Content Management (CM) instance
     Content Delivery (CD) instance
  • Deployment in Sitecore
    Deployment options
  • Sitecore Admin Pages
    Most used pages
  • Sitecore Backend
    Login 
    Sitecore Desktop 
    Switch databases 
    Control panel 
    Rebuild indexes 
  • System components 
    Website folder 
    License file 
    Logs 
    Connection strings 
  • Experience editor 
    Editing 
    Designing 
    Publishing 
  • Content Editor 
    Content Tree 
    Locked items 
    Publish 
    Republish 
    Smart publish 
    Preview Page 
    Ribbon 
  • Templates 
    Template manager 
    What is an item? 
    How are an item’s fields defined? 
    Template standard values 
    Default values 
    Insert Options 
    Layout Details 
  • Difference between Data template and Standard Value item 
    Inheritance 
  • Versioned vs Shared vs Unversioned fields in Sitecore 
  • Versioned layouts – Shared and final layout 
    Shared Layout 
    Final Layout 
  • Standard values’ presentation details + item’s presentation details
  • Layouts, Sublayouts , Renderings 
    Layouts 
    Sublayouts 
    Renderings 
    Placeholder 
  • Users and Roles
    Users
    Roles 
  • Security editor 
  • Workflow 

Sitecore Upgrade from 8.2 Update 1 to 8.2 Update 5

  1. Make backup of web folder

In case something goes wrong

  1. Disable configs

In the Sitecore.Xdb.config file or any patch you have 

Set the Xdb.Enabled setting to false.

Set the Xdb.Tracking.Enabled setting to false


To disable the Web Forms for Marketers module:

 Disable the following configuration file by adding .disabled to the file extension:

\Website\App_Config\Include\Sitecore.Forms.config


  1. Upgrade Sitecore

To upgrade the databases on solutions that are running Sitecore 8.2 rev. 161115 (Update-1) to Sitecore Experience Platform 8.2 rev. 170728 (8.2 Update-5):

Before you install the upgrade package, make a back-up your website.

To install the upgrade package:

  1. On the Sitecore Launchpad , click click Control Panel, and in the Administration section, click Install a package.

Alternatively, you can open the Installation Wizard from the Sitecore Desktop. Enter the following URL in your web browser:

http://<hostname>/sitecore/shell/

and then click Sitecore, Development Tools, Installation Wizard.

Install the Sitecore Update Installation Wizard 2.0.2 rev.170703.zip package.


Note

This step may be necessary if you installed Sitecore XP using the setup.exe file. The setup.exe file configures IIS to disallow access to the \sitecore\admin folder, and prevents you from using the Update Installation Wizard.

  1. On the Sitecore Launchpad, click Control Panel, and in the Administration section, click Install an update.


Alternatively, you can open the Update Installation Wizard by entering the following URL in your web browser:

http://<hostname>/sitecore/admin/UpdateInstallationWizard.aspx

  1. On the Welcome to Sitecore update installation wizard page, click Select a package, and select Sitecore 8.2 rev.180406.update package. Follow the steps in the wizard.

After the upgrade, I need to manually copy the following dependency in the web.config file, in order to have working Sitecore backend.


<dependentAssembly>

        <assemblyIdentity name=”HtmlAgilityPack” publicKeyToken=”bd319b19eaf3b43a” culture=”neutral” />

        <bindingRedirect oldVersion=”0.0.0.0-1.4.9.0″ newVersion=”1.4.9.0″ />

      </dependentAssembly>


  1. Upgrade the Web Forms for Marketers module

To upgrade the Web Forms for Marketers module, you must download the Web Forms for Marketers 8.2 rev. 180329 (Update-7) Update Package from the Sitecore Developer Portal. To install the Web Forms for Marketers 8.2 Upgrade Package, use the Update Installation Wizard.

To install the upgrade package:

  1. On the Sitecore Launchpad, click Control Panel, and in the Administration section, click Install an update.


Alternatively, to open the Update Installation Wizard, enter the following URL in your web browser:

http://<hostname>/sitecore/admin/UpdateInstallationWizard.aspx

The wizard guides you through the update process and helps you:

o Upload the upgrade package.

o Analyze the package.

o Install the package.


Upgrade multiple Web Forms for Marketers instances

For every Sitecore instance in your environment that you want to upgrade, you must repeat all the steps described in this section on the Content Management server (CM).

Note

If you have Content Delivery servers (CD), use the Web Forms for Marketers CD 8.2 rev. 180329 Upgrade Package and modify the Sitecore.Forms.config file as described in the Sitecore Web Forms for Marketers 8.2 Update-7 Installation Guide available on the Sitecore Developer Portal.

  1. Upgrade Local repository For Developers
  2. Make sure you reference correct Sitecore.* dlls


  1. Enable Sitecore.Forms.config
  2. Run Fix links

Run

 http://<hostname>/sitecore/admin/fixlinks.aspx

Press Go and wait to see status: idle


  1. Post-Installation Steps

After installing the upgrade package, to complete the installation, you must:

  • Clear the browser cache.
  • Publish the site.
  • Rebuild link database – Can take 30 minutes.
  • Rebuild the search indexes