This move allows us to create a better experience, more structured content, and improved accessibility for everyone interested in Sitecore, headless CMS, and modern web development.
What’s Changing?
Same great insights, tips, and deep dives into Sitecore.
A cleaner, more focused space for learning and sharing.
Easier navigation and better organization of content.
As a developer, there comes a time when you feel the itch to revamp your projects—to take them to the next level both in terms of functionality and design. For me, this moment came when I decided to rebuild my blog using Next.js, the React framework that has been making waves in the development community. What started as a curious experiment has quickly turned into a full-fledged migration, and I couldn’t be more excited to share my experience and lessons learned.
Why Next.js?
Before diving into the “how,” let’s talk about the “why.” My previous blog setup was functional but lacked the scalability and modern features that a framework like Next.js provides. Here’s what drew me to Next.js:
Server-Side Rendering (SSR): I wanted better performance and SEO for my blog, and SSR in Next.js is a game-changer for pre-rendering pages.
Static Site Generation (SSG): Many parts of my blog—like older posts—could benefit from being statically generated for blazing-fast load times.
File-Based Routing: Managing routes in Next.js is incredibly intuitive, thanks to its file-based routing system.
Built-In CSS and Image Optimization: Next.js offers native support for optimizing images and managing stylesheets, reducing the number of external dependencies.
Developer Experience: With features like hot reloading, API routes, and TypeScript support, working with Next.js is a joy.
My Training Journey
When I started with Next.js, I was no stranger to React, but I quickly realized that Next.js offers so much more than just a React wrapper. Here’s how I ramped up:
1. Official Documentation
The Next.js documentation became my go-to resource. It’s incredibly well-written and covers everything from the basics to advanced features like dynamic imports and middleware.
2. Building Small Projects
To get a feel for the framework, I built a few small apps, including a cashbook website and a simple short stay apartment page. These projects helped me understand concepts like SSR, SSG, and API routes.
3. Learning by Doing: Migrating the Blog
Once I felt comfortable, I began migrating my blog. This involved:
Analyzing the current blog structure: Deciding what should be server-rendered, statically generated, or dynamically loaded.
Creating a custom _app.js and _document.js for shared layouts and metadata.
Designing with Tailwind CSS: I chose Tailwind for styling, which pairs beautifully with Next.js.
Optimizing Images: Leveraging the next/image component for better performance.
Fetching Content: Integrating with my CMS using Next.js’s getStaticProps and getServerSideProps.
4. Continuous Learning
I’ve been keeping up with new features introduced in Next.js, such as App Router and React Server Components. Staying updated has been key to building a future-proof blog.
The Current State of the Blog
The blog is still a work in progress, but the transformation is already evident. Here are some of the improvements:
Faster Load Times: Thanks to SSG, pages load almost instantly.
Improved SEO: Server-rendered pages have significantly boosted my search rankings.
Dynamic Features: Components like a tag filter and a comment system are now built with Next.js API routes.
Better User Experience: The modern design and optimized performance make for a much smoother reading experience.
Check Out the New Blog (Work in Progress)
I’m thrilled to invite you to explore the new version of my blog, though please note that it’s still under development. You can find it here.
I’d love to hear your thoughts and feedback as I continue refining the site. Let me know what you think!
As a developer, experimenting with different tools and technologies is one of the most rewarding parts of the job. Recently, I built a Cashbook Application that combines Next.js, Firebase, and a charting library to create a comprehensive and dynamic solution for managing cash flow data.
This project was not just an exercise in building a functional app but also part of my training to master Next.js as I prepare to work more efficiently with Sitecore XM Cloud, which heavily relies on modern JavaScript frameworks like React and Next.js. Here’s a breakdown of my journey, key features, and lessons learned.
The full source code for this project is available on GitHub.
What is the Cashbook App?
The Cashbook App is a simple financial tracking application designed to help users:
Log income and expenses with details like date, amount, and description.
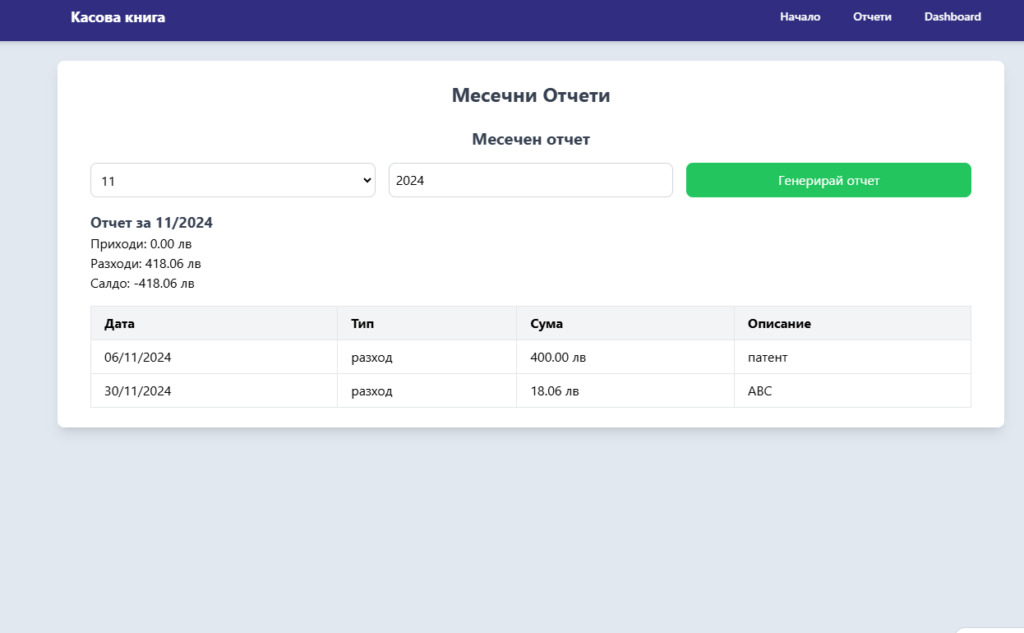
View monthly reports summarizing their financial activity.
Visualize trends with charts, such as cumulative totals and monthly comparisons.
Why Next.js?
Next.js is a powerful React framework that makes it easy to build fast, SEO-friendly, and scalable web applications. For the Cashbook App, it provided:
Built-in Routing: Seamless routing for pages like “Dashboard”, “Reports”, and “Login”.
API Routes: Used to integrate Firebase for storing and retrieving data.
SSR and CSR Options: Allowed dynamic charts to load only on the client, resolving server-side rendering issues with libraries like ApexCharts.
Why Firebase?
For a cashbook application, a robust and easy-to-use database is essential. Firebase Realtime Database was an excellent choice because of:
Ease of Use: Straightforward setup for CRUD operations.
Real-time Sync: Instant updates across devices.
Free Tier: Perfect for small-scale applications like this.
Challenges with Firebase
Read-Only Deployment on Vercel: Since Vercel uses a read-only filesystem, I had to rely on Firebase entirely for data storage and updates.
Handling Firebase Keys Securely: Environment variables were managed using Vercel’s settings to ensure security.
Data Visualization with ApexCharts
One of the app’s highlights is its ability to visualize financial data. After testing several libraries, I chose ApexCharts for its:
Customizability: Easy to tweak chart options.
Elegant Design: Charts look professional with minimal setup.
SSR Compatibility: While dynamic imports resolved most issues, ApexCharts worked smoothly in a client-side rendered setup.
Key Features of the Cashbook App
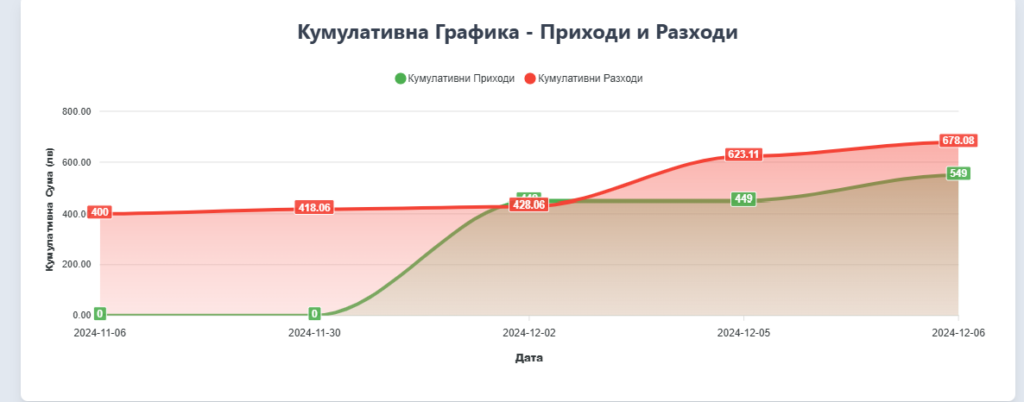
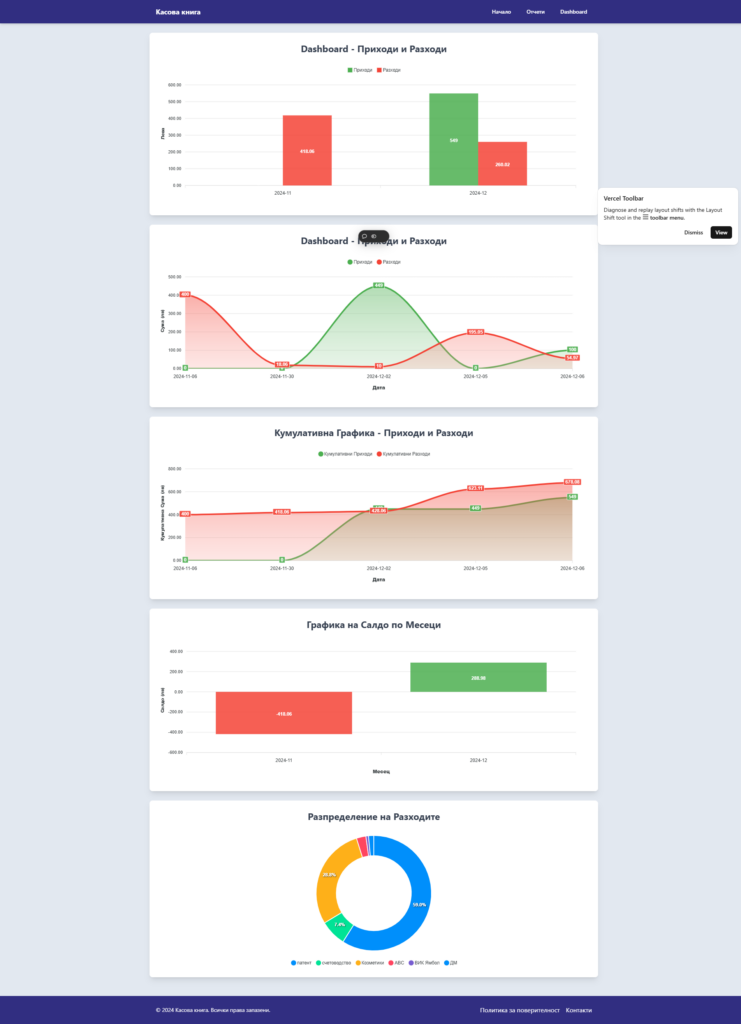
1. Cumulative Chart
Tracks cumulative income and expense over time, helping users visualize their financial trajectory.
2. Area Chart
Compares income and expenses over time, providing insights into spending patterns.
3. Monthly Bar Chart
Displays total income and expenses for the last 12 months.
Here’s a snippet for generating a Cumulative Chart with ApexCharts:
Interactive Tables
The Cashbook entries are displayed in a sortable, paginated table. Entries are color-coded (e.g., green for income and red for expenses).
Lessons Learned
While building this project, I faced several challenges:
Chart Libraries and Deployment: Recharts and Chart.js had SSR-related deployment issues on Vercel. ApexCharts, with dynamic imports, proved to be a more robust solution.
Data Aggregation: Aggregating data from Firebase for charts required meticulous grouping and calculation logic.
Secure API Keys: Storing sensitive Firebase credentials in .env.local and configuring them securely in Vercel was crucial.
Final Thoughts
The Cashbook App was a rewarding project that strengthened my skills in:
React Frameworks: Leveraging Next.js features effectively.
Database Integration: Handling real-time data with Firebase.
Data Visualization: Designing meaningful charts for actionable insights.
The app is fully open-source and available on GitHub. I hope this inspires you to build your own data-centric applications with these tools.
In our recent Sitecore project, we integrated Azure Blob Storage to handle various types of media and data files for the backend, ensuring scalability and security. While this setup provided excellent support for content storage and retrieval, we encountered a need for efficient file management to maintain an optimized storage structure. Specifically, we needed a way to:
Clean up old files from storage that were no longer required.
Move files from one folder to another, adjusting the structure to reflect changes in our content hierarchy.
Here’s a closer look at the challenges we faced and how we addressed them.
The Challenge: Managing Files Without Filenames
In Azure Blob Storage, files are typically stored with a structure that includes both an ID and a filename. However, our use case only provided us with file IDs, not their associated filenames. This made direct identification of files cumbersome, especially when handling batch deletions or moving files across folders.
To solve this, we implemented custom methods that operate on file prefixes (in this case, the file ID) rather than full filenames. These methods enabled us to manage our files in Azure Blob Storage effectively.
Solution Part 1: Deleting Files by Prefix
The first task was to delete files that matched a specific prefix, which allowed us to remove old, unused files without needing the exact filenames. Using the following method, DeleteBlobByPrefixAsync, we were able to search for files by their ID prefix and delete them in bulk.
public static async Task DeleteBlobByPrefixAsync(string prefix, string path)
{
    // Create a BlobServiceClient to connect to the storage account
    BlobServiceClient blobServiceClient = new BlobServiceClient(connectionString);

    // Get a reference to the container
    BlobContainerClient containerClient = blobServiceClient.GetBlobContainerClient(containerName);

    // Define the path and prefix to search within
    string pathPrefix = path + "/" + prefix; // e.g., "video/short-videos/6245387_"

    // List all blobs under the specified path
    await foreach (BlobItem blobItem in containerClient.GetBlobsAsync(prefix: path))
    {
        // Check if the blob name starts with the specified prefix
        if (blobItem.Name.StartsWith(pathPrefix))
        {
            // Get a reference to the blob
            BlobClient blobClient = containerClient.GetBlobClient(blobItem.Name);

            // Delete the blob
            await blobClient.DeleteIfExistsAsync();
            Console.WriteLine($"Deleted blob: {blobItem.Name}");
        }
    }
}
This approach provided a flexible way to remove files based on their ID prefix, helping us streamline storage without unnecessary accumulation of outdated files.
Solution Part 2: Moving Files by Prefix
Our second task involved moving files from one folder to another based on their prefix, reflecting updates to our content organization. With the MoveBlobByPrefixAsync method, we could locate files by their prefix and transfer them seamlessly to a new storage path within Azure Blob Storage.
 public static async Task MoveBlobByPrefixAsync(string prefix, string path, string destinationPath)
 {
     // Create a BlobServiceClient to connect to the storage account
     BlobServiceClient blobServiceClient = new BlobServiceClient(connectionString);

     // Get a reference to the container
     BlobContainerClient containerClient = blobServiceClient.GetBlobContainerClient(containerName);

     // List all blobs under the specified path
     await foreach (BlobItem blobItem in containerClient.GetBlobsAsync(prefix: path))
     {
         // Check if the blob name starts with the specified prefix
         if (blobItem.Name.StartsWith(path + "/" + prefix))
         {
             // Get a reference to the original blob
             BlobClient sourceBlobClient = containerClient.GetBlobClient(blobItem.Name);

             // Define the new blob name (retaining the same name)
             string newBlobName = $"{destinationPath}/{blobItem.Name.Substring(blobItem.Name.LastIndexOf('/') + 1)}"; // Get the original blob name

             // Get a reference to the destination blob
             BlobClient destinationBlobClient = containerClient.GetBlobClient(newBlobName);

             // Copy the blob to the new location
             await destinationBlobClient.StartCopyFromUriAsync(sourceBlobClient.Uri);

             // Optionally, delete the original blob after copying
             await sourceBlobClient.DeleteIfExistsAsync();
             Console.WriteLine($"Moved blob: {blobItem.Name} to {newBlobName}");
         }
     }
 }
This method was instrumental in helping us restructure our storage, making it easier to manage and locate files within our content hierarchy.
Automating the Process with a Console App
To make this process more efficient, I created a console application that reads a CSV file containing a list of IDs and statuses. For each row in the CSV file, the console app performs the corresponding action—either calling DeleteBlobByPrefixAsync to remove files or MoveBlobByPrefixAsync to relocate them based on the status specified in each row. This console app allowed us to process file management tasks in bulk, minimizing manual work and ensuring consistency across our storage environment.
As I dive deeper into headless technology and frameworks like Next.js, I can’t help but reconsider how much this industry has evolved since I started working. Back in 1998, my career began with a desktop store app written in Visual FoxPro, complete with its own database engine. Visual FoxPro, released in 1995, was a go-to tool for database applications. This was a time when tech books weren’t available, at least not in the Bulgarian market. Learning was all about using the help menu—yes, the help of Visual FoxPro itself. Internet access wasn’t even available at home; we had limited access at the university, and the only search engine was Yahoo, which didn’t have many results.
Maybe the only consistency in my career is MS SQL Server—it’s been around for decades, first released in 1989, and widely used ever since. Today, I have colleagues who weren’t even born when I started. I remember when ASP (Microsoft’s Active Server Pages, introduced in 1996) was the most modern way to build websites. It was fancy for the time! I even remember working with asynchronous calls before they formally called it “AJAX.” It wasn’t until 2005 that the term AJAX was coined by Jesse James Garrett, but we’d been doing similar things before that.
In those days, there were no FEs, QAs, DevOps, PMs, or AMs—none of the abbreviations of today! Learning HTML, CSS, and JavaScript was just part of a normal day.
Enter the CMS Era The arrival of content management systems (CMS) changed everything. Now, content editors could update content without needing to call us to build or deploy it. My first CMS was Microsoft CMS, released in 2001. This was around 2002, and yes, most of you readers were probably not born yet! I don’t remember all the details, but I worked on a few projects where we built admin portals so clients could manage content themselves. We even started teaching them how to use these tools.
The MVC Revolution Then came MVC frameworks. Microsoft launched ASP.NET MVC in 2009, and it felt revolutionary to build websites with this kind of structure. It simplified the process, making it easy to manage and pass data through controllers and views. Eventually, we moved from good old web services to REST APIs. REST, introduced by Roy Fielding in 2000, became the standard for web services because it was simpler than SOAP.
Sitecore
Later, I started working with Sitecore, starting with version 6, which was released in 2008. Sitecore was robust, offering tons of features, and it allowed for a lot of customization using C# and API calls. SXA (Sitecore Experience Accelerator) arrived later, in 2016, with predefined components that allowed clients to build pages on their own. So, I learned SXA, variants, and themes—a new level of learning.
The PowerShell module for Sitecore made it easier to handle batches of items around 2012 with the Sitecore PowerShell Extensions (SPE). Then there was TDS (Team Development for Sitecore), and later Unicorn (2014) and Razl, tools that simplified content synchronization between environments. I even learned to write PowerShell scripts to create Windows schedulers that could sync content between environments automatically, letting me sleep while work happened!
Component-Oriented Development and the Cloud Then Helix design principles were introduced in 2016. This component-oriented approach led to solutions with 60+ projects, making readability and feature management easier. Around the same time, Azure and other cloud platforms started to change how we work. Microsoft Azure launched in 2010, bringing with it managed cloud services. Tools like Application Insights (2014) became necessary for tracking and logging without needing traditional servers.
The Headless Shift and the Rise of Modern JavaScript Frameworks Then came headless technology and the push to separate frontend and backend development. This shift started around 2015, driven by the need for flexibility in mobile and single-page applications. Now I’m learning Visual Studio Code (released in 2015), Node.js, React (launched by Facebook in 2013), Next.js (launched by Vercel in 2016), Storybook, Vercel, and other tools. React and Next.js are incredibly fast compared to traditional .NET applications, and their modularity aligns perfectly with the headless approach.
AI and the Modern Developer’s Toolkit In today’s world, we have countless free courses online, and tools like ChatGPT are widely used in our sector. OpenAI launched ChatGPT in late 2022, and by 2023 it became a staple for helping with small tasks, like writing better comments in Jira. While it can handle some trivial tasks, it doesn’t go far beyond the easy level in development yet.
A Never-Ending Learning Curve So, we keep learning! The learning curve never ends. It doesn’t end with school, university, or an IT crash course. And while many think a few months of training is enough to demand big salaries and think they “know everything,” the truth is—you know nothing, Jon Snow!
Upon reading posts from Sitecore Symposium on LinkedIn and learning about Sitecore Stream, I was brought back to a performance issue we encountered with Sitecore Workbox earlier in the year.Significant speed problems were seen by our client, who handles a lot of content; in particular, non-admin users were having timeouts when attempting to load the Workbox.
The Challenge:
The client’s Sitecore XP 9.2 instance was struggling with Workbox performance due to the massive amount of items in Draft state across multiple versions. Out-of-the-box (OOTB) Sitecore Workbox loads all items in all workflow states, which led to excessive database load and frequent timeouts for non-admin users. Admins could access the Workbox, but it took around 3 minutes, while non-admins encountered timeouts after 3.8 minutes due to Azure’s default timeout settings.
The root cause was that the Workbox was querying too many items in Draft and other states, causing spikes in database usage and performance degradation.
I’ve created a Sitecore support ticket and explained the issue.Sitecore Support suggested a range of solutions, including database index optimizations and tuning specific settings like Workbox.SingleWorkflowStateVersionLoad.Threshold, which was initially set to 8000. To enhance access control and database speed, changes were performed, such as lowering the threshold to 100 and building SQL indexes based on KB0879610. The timeouts continued, and performance only slightly improved in spite of these efforts.
Key Findings:
The AccessResultCache was consuming excessive memory
The VersionedFields table contained millions of records, adding to the database load.
Despite implementing various suggestions, including temporary disabling of cache size limits and tuning SQL queries, Workbox performance remained suboptimal.
The Solution: Leveraging Sitecore Advanced Workbox:
After struggling with this issue, I decided to revisit an old but reliable solution — the Sitecore Advanced Workbox. I was used this module long time in the past. We obtained the source code from GitHub and upgraded it to be compatible with Sitecore 9.2. Instead of fetching Draft items on initial load, I’ve changed the code to show the items in “Awaiting Approval” state.
The result? The Workbox for non-admin users started to work! No more time-outs!
Conclusion:
By customizing and upgrading the Sitecore Advanced Workbox, we successfully addressed the Workbox performance issues caused by the large volume of content in Draft state. This solution ensured smoother operation for non-admin users, significantly improving productivity and system performance.
The source code for this solution can be found here.
We’ve been experiencing several issues with the integration of OneTrust and our Sitecore websites. Sometimes images fail to load, static JavaScript files are blocked, or even loaded twice. This has affected the functionality of our site, causing disruptions to key components. In this post, I’ll walk you through the challenges we’ve faced, especially regarding a pagination issue, and how we ultimately resolved it.
What is OneTrust?
For those unfamiliar, OneTrust is a platform that helps organizations comply with privacy regulations, including GDPR and CCPA, by managing cookie consent and data privacy settings. It categorizes cookies and scripts into different categories, such as essential, tracking, or marketing cookies, giving users control over which cookies are allowed to run on their browser.
Our OneTrust-Sitecore Integration
Our integration between OneTrust and Sitecore is customized. It includes functionality where content admins can input a OneTrust ID and specify categories of cookies and scripts via Sitecore settings. This allows for flexibility but also introduces complexity that can lead to issues, particularly when changes in cookie consent affect how scripts are loaded on the website.
The Pagination Issue
Recently, we encountered a major issue with our pagination component. Whenever users accepted cookies and refreshed the page, the pagination stopped working altogether. However, if we skipped tracking cookies, everything worked perfectly fine.
I spent hours investigating the problem, trying different configurations, debugging the JavaScript, and examining network calls. Eventually, I found the root cause: OneTrust was adding a category (c004) to our jquery.js script. At the end of the page load, this caused the script to reload—likely with an incorrect MIME type, such as text/plain instead of text/javascript. This misconfiguration broke the functionality of the pagination component, as the required scripts were not being executed properly.
The Final Solution
After much trial and error, the solution turned out to be simple: we needed to add the data-ot-ignore attribute to the <script> tag of jquery.js. This prevented OneTrust from modifying or reloading the script, ensuring that the correct version of the script loaded with the right MIME type.
By adding data-ot-ignore, we bypassed OneTrust’s interference with the script, and the pagination component started working flawlessly again.
Conclusion
Integrating OneTrust with Sitecore offers significant advantages in terms of cookie management and regulatory compliance. However, it can also introduce technical issues like blocked or reloaded scripts. In our case, OneTrust’s script categorization disrupted key components of our site, such as pagination. Fortunately, the fix was straightforward once identified: adding the data-ot-ignore attribute to scripts we wanted to protect from OneTrust’s handling.
If you’re facing similar challenges with OneTrust integration in Sitecore, make sure to carefully investigate how OneTrust is categorizing and managing your scripts, and consider using data-ot-ignore where appropriate to prevent such issues.
While using Sitecore Managed Cloud with Azure Front Door, we randomly encountered a browser error: “The request is blocked.” We had no idea why this was happening.
I worked with our DevOps team since we are using Azure Front Door for traffic management, where a rule was set to block requests that exceed a specified value. So, when a user refreshed a webpage 5-6 times, they received the above message. Sometimes , they did not receive the message but receive a blocked js or css files, or even images and the page looks broken.
We dealt with this problem for a few days and could not find an easy solution. Finally, we decided to exclude CSS, JS, and image files from the rule.
Our Solution: Creating a Rule to Exclude Static Assets
Storybook is an excellent tool for developing UI components in isolation, and in this post, we’ll walk through creating a new Story for the Card component in your Sitecore XM Cloud Foundation Head project. We will define three different versions of the Card component: Default, Small, and Large, with varying layout sizes and mock data.
Step 1: Create a Story File for the Card Component
Inside your Storybook setup, create a new file in your project, following a similar path to where your Card component exists. Typically, you’ll want to place it within a stories or components folder.
Let’s assume your project structure looks like this:
In Card.stories.tsx, we will define the stories for the Card component using mock data.
Step 2: Import Dependencies and Define Metadata
First, import the necessary modules from Storybook and Sitecore JSS to ensure the component and fields are correctly typed:
import type { Meta, StoryObj } from '@storybook/react';
import { CardWithImage as CardImage } from '../components/Card';
import { ImageField, LinkField } from '@sitecore-jss/sitecore-jss-nextjs';
import '../assets/main.scss';
Next, define the metadata (meta) for the Card component, which will be used by Storybook to render the component properly:
const meta = {
  component: CardImage,
} satisfies Meta<typeof CardImage>;

export default meta;
This block of code informs Storybook that the CardImage component is the one being used and provides the necessary type checks.
Step 3: Define Story Variants
We’ll now create different versions of the Card component (called “stories”) by passing in mock data. Each story represents a different size of the card (Default, Small, and Large), using mock heading, body, link, and image fields from Sitecore JSS.
Here’s the structure for our Default, Small, and Large stories:
 type Story = StoryObj;
 // Default Card
 export const Default: Story = {
   args: {
     params: {
       styles: 'col-lg-4', // Custom class for layout
     },
     fields: {
       heading: {
         value: 'Sample Heading',
       },
       body: {
         value: 'This is a sample content. You can replace this with your actual content from Sitecore.',
       },
       link: {
         href: 'https://www.example.com',
         text: 'Click here to learn more',
       } as unknown as LinkField,
       image: {
         src: 'https://via.placeholder.com/300x200', // Dummy placeholder image
         alt: 'Placeholder Image',
       } as ImageField,
     },
     index: 0, // Optional index property
   },
 };
 // Small Card
 export const Small: Story = {
   args: {
     params: {
       styles: 'col-lg-3', // Smaller layout
     },
     fields: {
       heading: {
         value: 'Sample Heading',
       },
       body: {
         value: 'This is a sample content. You can replace this with your actual content from Sitecore.',
       },
       link: {
         href: 'https://www.example.com',
         text: 'Click here to learn more',
       } as unknown as LinkField,
       image: {
         src: 'https://via.placeholder.com/300x200', // Dummy placeholder image
         alt: 'Placeholder Image',
       } as ImageField,
     },
     index: 0,
   },
 };
 // Large Card
 export const Large: Story = {
   args: {
     params: {
       styles: 'col-lg-6', // Larger layout
     },
     fields: {
       heading: {
         value: 'Sample Heading',
       },
       body: {
         value: 'This is a sample content. You can replace this with your actual content from Sitecore.',
       },
       link: {
         href: 'https://www.example.com',
         text: 'Click here to learn more',
       } as unknown as LinkField,
       image: {
         src: 'https://via.placeholder.com/300x200', // Dummy placeholder image
         alt: 'Placeholder Image',
       } as ImageField,
     },
     index: 0,
   },
 };
Step 4: Running Storybook
Once your story is defined, you can launch Storybook to visualize the different variants of the Card component. Run the following command in your terminal:
npm run storybook
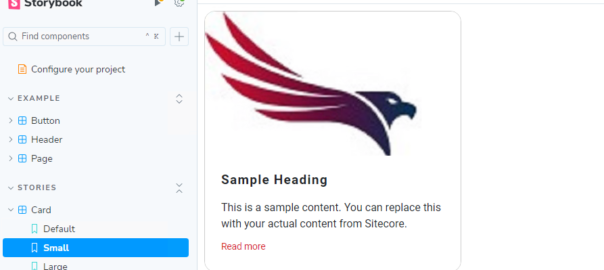
Storybook will start on http://localhost:6006. You should see the Card component rendered with three variants: Default, Small, and Large. Each will show a mock card with a heading, body, link, and image.
Storybook is a powerful tool for developing, documenting, and testing UI components in isolation. It can be incredibly useful when working with Sitecore XM Cloud projects. In this guide, I will walk you through integrating Storybook into the Sitecore XM Cloud Foundation Head project.
Prerequisites
Make sure you have the following installed:
Node.js (We’ll use NVM to manage Node.js versions)
GitHub CLI: Install it using the command below:
winget install --id github.cli
After installation, restart your terminal.
Step 1: Manage Node Versions with NVM (Optional)
To ensure you’re using the correct Node.js version, install NVM (Node Version Manager) for Windows.